| LIBROW | ® |
| Products | Solutions | Vehicles | Articles | Inquiry | Contacts | My account |
Article 8
Hybrid median filter
Category. Digital image processing (DIP) software development.
Abstract. The article is a practical tutorial for hybrid median filter understanding and implementation. Article contains theory, C++ source code, programming instructions and a sample applications.
Limited offer
Professional Librow Calculatorvisit
for free
- Bessel functions
- gamma function
- complex numbers
7.4 MB for Windows
 |
Download hybrid median filter for Win32 (zip, 1.03 MB) |
 |
Download hybrid median filter C++ source code (zip, 2 kB) |

1. Introduction to hybrid median filter
Hybrid median filter is windowed filter of nonlinear class, that easily removes impulse noise while preserving edges. In comparison with basic version of the median filter hybrid one has better corner preserving characteristics. The basic idea behind filter is for any element of the signal (image) apply median technique several times varying window shape and then take the median of the got median values.
To get acquainted with filter window idea in signal and image processing read our “Filter window, or filter mask” article.
2. Understanding hybrid median filter
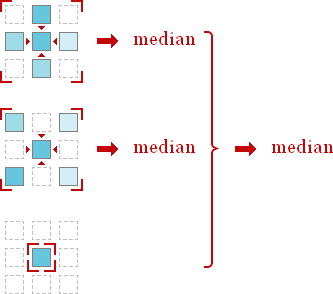
Now let us see, how hybrid version of the median filter works. In one phrase idea is like “apply median filter with cross-mask, apply median filter with x-mask and take the median of got results and element itself”. Hybrid median filter workflow depicted below in fig. 1.
 Fig. 1. Hybrid median filter workflow.
Due to the nature of the workflow the filter dimension is not less than 2D.
Now let us write down step-by-step instructions for processing by hybrid median filter.
Hybrid median filter algorithm:
- Place a cross-window over element;
- Pick up elements;
- Order elements;
- Take the middle element;
- Place a x-window over element;
- Pick up elements;
- Order elements;
- Take the middle element;
- Pick up result in point 4, 8 and element itself;
- Order elements;
- Take the middle element.
Now, when we have the algorithm, it is time to write some code — let us come down to programming.
3. Hybrid median filter programming
We can see that operation of taking median — “order elements” and “take the middle element” — repeated three times in the list. So it is good idea to put those steps into separate function:
//   MEDIAN calculation
//     elements - input elements
//     N        - number of input elements
element median(element* elements, int N)
{
   //   Order elements (only half of them)
   for (int i = 0; i < (N >> 1) + 1; ++i)
   {
      //   Find position of minimum element
      int min = i;
      for (int j = i + 1; j < N; ++j)
         if (elements[j] < elements[min])
            min = j;
      //   Put found minimum element in its place
      const element temp = elements[i];
      elements[i] = elements[min];
      elements[min] = temp;
   }
   //   Get result - the middle element
   return elements[N >> 1];
}
In the function above we are using a code optimization trick. Since everything we need is middle element, it is enough to order just a half of elements.
Let us have 2D signal or image of length N×M as input and let we choose filter window of 3×3 size. The first step is window placing — we do that by changing index of the leading element:
//   Move window through all elements of the image
for (int m = 1; m < M - 1; ++m)
   for (int n = 1; n < N - 1; ++n)
Pay attention, that we are not processing first and last rows and columns. The problem is we cannot process elements at edges, because in this case the part of the filter window is empty. We will discuss below, how to solve that problem.
The second step is picking up elements around with cross-window, ok:
//   Pick up cross-window elements
window[0] = image[(m - 1) * N + n];
window[1] = image[m * N + n - 1];
window[2] = image[m * N + n];
window[3] = image[m * N + n + 1];
window[4] = image[(m + 1) * N + n];
The third and fourth steps are done by our auxiliary function:
//   Get median
results[0] = median(window, 5);
Fifth and sixth steps are picking up elements with x-window:
//   Pick up x-window elements
window[0] = image[(m - 1) * N + n - 1];
window[1] = image[(m - 1) * N + n + 1];
window[2] = image[m * N + n];
window[3] = image[(m + 1) * N + n - 1];
window[4] = image[(m + 1) * N + n + 1];
Seventh and eighth steps are made again by our auxiliary function:
//   Get median
results[1] = median(window, 5);
To complete ninth step enough to pick up our leading element itself:
//   Pick up leading element
results[2] = image[m * N + n];
Final steps are performed by our useful function:
//   Get result
result[(m - 1) * (N - 2) + n - 1] = median(results, 3);
At last, let us write down the entire algorithm as function:
//   2D HYBRID MEDIAN FILTER implementation
//     image  - input image
//     result - output image
//     N      - width of the image
//     M      - height of the image
void _hybridmedianfilter(const element* image, element* result, int N, int M)
{
   //   Move window through all elements of the image
   for (int m = 1; m < M - 1; ++m)
      for (int n = 1; n < N - 1; ++n)
      {
         element window[5];
         element results[3];
         //   Pick up cross-window elements
         window[0] = image[(m - 1) * N + n];
         window[1] = image[m * N + n - 1];
         window[2] = image[m * N + n];
         window[3] = image[m * N + n + 1];
         window[4] = image[(m + 1) * N + n];
         //   Get median
         results[0] = median(window, 5);
         //   Pick up x-window elements
         window[0] = image[(m - 1) * N + n - 1];
         window[1] = image[(m - 1) * N + n + 1];
         window[2] = image[m * N + n];
         window[3] = image[(m + 1) * N + n - 1];
         window[4] = image[(m + 1) * N + n + 1];
         //   Get median
         results[1] = median(window, 5);
         //   Pick up leading element
         results[2] = image[m * N + n];
         //   Get result
         result[(m - 1) * (N - 2) + n - 1] = median(results, 3);
      }
}
Looks very straightforward.
Type element could be defined as:
typedef double element;4. Treating edges
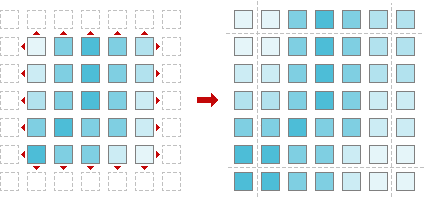
For all window filters there is some problem. That is edge treating. If you place window over an element at the edge, some part of the window will be empty. To fill the gap, signal should be extended. For hybrid median filter there is good idea to extend image symmetrically, like this:
 Fig. 2. Image extension.
In other words we are adding lines at the top and at the bottom of the image and add columns to the left and to the right of it.
So, before passing signal to our median filter function the signal should be extended. Let us write down the wrapper, that makes all preparations.
//   2D HYBRID MEDIAN FILTER wrapper
//     image  - input image
//     result - output image
//     N      - width of the image
//     M      - height of the image
void hybridmedianfilter(element* image, element* result, int N, int M)
{
   //   Check arguments
   if (!image || N < 1 || M < 1)
      return;
   //   Allocate memory for signal extension
   element* extension = new element[(N + 2) * (M + 2)];
   //   Check memory allocation
   if (!extension)
      return;
   //   Create image extension
   for (int i = 0; i < M; ++i)
   {
      memcpy(extension + (N + 2) * (i + 1) + 1,
         image + N * i,
         N * sizeof(element));
      extension[(N + 2) * (i + 1)] = image[N * i];
      extension[(N + 2) * (i + 2) - 1] = image[N * (i + 1) - 1];
   }
   //   Fill first line of image extension
   memcpy(extension,
      extension + N + 2,
      (N + 2) * sizeof(element));
   //   Fill last line of image extension
   memcpy(extension + (N + 2) * (M + 1),
      extension + (N + 2) * M,
      (N + 2) * sizeof(element));
   //   Call hybrid median filter implementation
   _hybridmedianfilter(extension, result ? result : image, N + 2, M + 2);
   //   Free memory
   delete[] extension;
}
As you can see, our code takes into account some practical issues. First of all we check our input parameters — image should not be NULL, and image sizes should be positive:
//   Check arguments
if (!image || N < 1 || M < 1)
   return;
Now let us allocate memory for signal extension.
//   Allocate memory for signal extension
element* extension = new element[(N + 2) * (M + 2)];
And check memory allocation.
//   Check memory allocation
if (!extension)
   return;
Now we are building extension.
//   Create signal extension
for (int i = 0; i < M; ++i)
{
   memcpy(extension + (N + 2) * (i + 1) + 1,
      image + N * i,
      N * sizeof(element));
   extension[(N + 2) * (i + 1)] = image[N * i];
   extension[(N + 2) * (i + 2) - 1] = image[N * (i + 1) - 1];
}
//   Fill first line of image extension
memcpy(extension,
   extension + N + 2,
   (N + 2) * sizeof(element));
//   Fill last line of image extension
memcpy(extension + (N + 2) * (M + 1),
   extension + (N + 2) * M,
   (N + 2) * sizeof(element));
Finally, everything is ready — filtering!
//   Call hybrid median filter implementation
_hybridmedianfilter(extension, result ? result : image, N + 2, M + 2);
And to complete the job — free memory.
//   Free memory
delete[] extension;
Since we are using memory management function from standard library, we should include its header.
#include <memory.h>5. Hybrid median filter declaration file
Now we have three functions: helper function, hybrid median filter and entry point that makes preparations. Let us write code for header file.
#ifndef _HYBRIDMEDIANFILTER_H_
#define _HYBRIDMEDIANFILTER_H_

//   Image element type
typedef double element;

//   2D HYBRID MEDIAN FILTER, window size 3x3
//     image  - input image
//     result - output image, NULL for inplace processing
//     N      - width of the image
//     M      - height of the image
void hybridmedianfilter(element* image, element* result, int N, int M);

#endif
Now all is ready. The code we have written is good both for Linux/Unix and Windows platforms. You can download full hybrid median filter source code here:
 |
Download hybrid median filter C++ source code (zip, 2 kB) |
Full file listings are available online as well:
- Appendix A.1. Hybrid median filter source code — hybridmedianfilter.h — file of declarations;
- Appendix A.2. Hybrid median filter source code — hybridmedianfilter.cpp — file of implementation.
And now — a couple of applications to play around!
6. Color median filter: image restoration
 |
Download hybrid median mean filter for Win32 (zip, 1.03 MB) |
We have created a couple of applications to show hybrid median filter capabilities in restoration images corrupted by impulse noise. The sample package includes 4 files — two applications, sample image and description:
- hybridmedian.exe — median filter,
- corrupter.exe — destructive noise generator,
- sample.bmp — 24-bit sample image,
- readme.txt — description.
Be aware of the fact, that this sample uses OpenGL, so it should be supported by your system (usually that is the case).
7. Step 1: prepare corrupted image
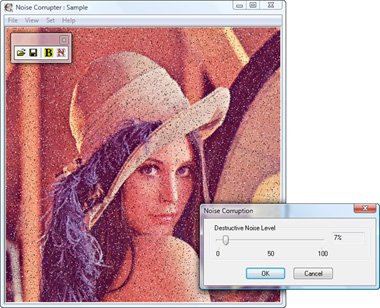
We have created impulse noise generator that will help us to prepare corrupted image. Start up corrupter.exe application and load image to be corrupted. Choose Set >> Corruption... or click N-button in toolbar and set noise level at 5–15%. Click OK. Then save corrupted image.
 Fig. 3. Corruption by impulse noise.
8. Step 2: restore corrupted image
Start up hybridmedian.exe application. Load the saved corrupted image. Apply hybrid median filter by choosing Set >> Filter or clicking F-button in toolbar. See the result. If necessary, filter the image one more time.
 Fig. 4. Image restored by hybrid median filter.
|
|
|||||||||||||
|
|||||||||||||


